


Customizing Javascript Plugin from Django Comments Xtd
10003
Introduction
When I reached the point where I needed to integrate some comment system to this blog I've decided to stop at django-comments-xtd. It meets almost all my requirements: nice documentation, comprehensive functionality and it has javascript plugin that works via the API. To customize it you'll need to download the whole repository as it is said in the tutorial of the documentation. But I did not really want to download the whole repository to my project to edit only a bit of it for my purposes. So in this tutorial, we will learn how to customize it without downloading the whole repository.
If you want to skip tutorial you can just go to the project repository and check the commit that was made for this tutorial.
Setting up
We will need node.js later. Before we start, please, make sure you have npm installed.
I will use a ready base for the blog application based on this tutorial of Django Central. I totally recommend you get through the tutorial before we start working here.
I put a tag 'v1.0.0' to my repository - this is the version of the base that we are going to apply our changes to get django-comments-xtd working.
Clone the repository to your local PC via terminal git command:
git clone --branch v1.0.0 https://github.com/salvicode/django_test_blog.gitAnd then go to the folder created by git django_test_blog:
cd django_test_blogLet's create a virtual environment for this tutorial to isolate this and don't mix with other stuff we are probably working on using python. If you don't have a virtual environment and you don't know what it is I suggest you go and study information about it. To create virtual env run the following:
virtualenv venv
This command will create a virtual environment in the folder venv. You can check the content of that folder if you are curious. Now we need to activate this virtual environment:
source venv/bin/activate
Now in your command line, you should see (venv) before your username or django_test_blog folder name(it depends on how your terminal is set up). In my case it is:

I have customized my terminal. I have idea of writing an article about terminal customization.
Now let's install dependencies for our test blog project. Run the following command:
pip install -r requirements.txt
This command will install all the necessary requirements. Probably you will notice some errors about astroid 2.3.3. Just ignore it. It is used for python linting which is not important in this tutorial.
We are all set up. Let's switch to the folder test_blog:
cd test_blog
And prepare our blog app models, etc with the following commands:
python manage.py migrate
Let's check if everything works fine:
python manage.py runserver
If everything is ok you should be able to open our blog app at http://localhost:8000/ :

Now stop the server pressing CTRL+C in the terminal.
We need to create a superuser to manage our blog articles. Run the following command:
python manage.py createsuperuser
And then input user name, user email, user password. I usually use admin, admin@admin.com, admin as credentials for testing purposes. In this case, it will warn you the password is a too weak password. Just enter Y.
Now run the server again
python manage.py runserver
And go to http://localhost:8000/admin. Login with the credential we've created before. Find the section "Blog", row "Posts" and click "Add". Or you can go instantly here http://localhost:8000/admin/blog/post/add/. Make your example post, set status "Publish". I used lorem ipsum to generate some dummy content(I think it is used to summon a devil .
.
I've created post My awesome post, so the link should be http://localhost:8000/my-awesome-post/. Or you can find your new post on the main page.

Now we are all set up. Let's integrate django-comments-xtd.
Django-comments-xtd
First, let's install it:
pip install django-comments-xtd
We are going to use django-comments-xtd through the api so let's install Rest Framework:
pip install djangorestframework
Open the file test_blog/settings.py, find INSTALLED_APPS, and add comments apps:
INSTALLED_APPS = [
    ...

    'django.contrib.sites',
    'rest_framework',
    'django_comments_xtd',
    'django_comments',
]
Django comments require django.contrib.sites
And somewhere at the very end of the file settings.py:
...
COMMENTS_APP = 'django_comments_xtd'
COMMENTS_XTD_CONFIRM_EMAIL = False
For testing purposes, I disabled email confirmation now.
Open file test_blog/urls.py and add URL path config for the comments:
from django.views.i18n import JavaScriptCatalog  # Add also this import

urlpatterns = [
    path('admin/', admin.site.urls),
    path('comments/', include('django_comments_xtd.urls')),  # This line should be added
		path(r'jsi18n/', JavaScriptCatalog.as_view(), name='javascript-catalog'),  # This line should be added
    path('', include('blog.urls')),
    path('summernote/', include('django_summernote.urls')),
    path("sitemap.xml", sitemap, {"sitemaps": sitemaps}, name="sitemap"),
		#path('',views.index, name="homepage"),
]
Please, notice that the added path lines should be above path('', include('blog.urls')), otherwise the URL resolver will get lost in 'blog.urls' and won't be available to find the correct path.
Now let's modify our markup. Open file templates/post_detail.html. Remove all div blocks located below
{% block sidebar %} {% include 'sidebar.html' %} {% endblock sidebar %}
Now we removed the old comments system. And let's add a block responsible for the new comment system. After div block 'card-body' add the following:
<div id="comments"></div>
Replace the line {% load crispy_forms_tags %} with:
{% load static %}
{% load comments %}
{% load comments_xtd %}
And add at the end of the post_detail.html:
{% endblock content %}

{% block extra-js %}
<script crossorigin src="<https://unpkg.com/react@16/umd/react.production.min.js>"></script>
<script crossorigin src="<https://unpkg.com/react-dom@16/umd/react-dom.production.min.js>"></script>
<script>
 window.comments_props = {% get_commentbox_props for post %};
 window.comments_props_override = {
     allow_comments: true,
     allow_feedback: true,
     show_feedback: true,
     allow_flagging: true,
     poll_interval: 5000  // In milliseconds.
 };
</script>
<script
  src="<https://code.jquery.com/jquery-3.3.1.min.js>"
  crossorigin="anonymous"></script>
<script
  src="<https://cdnjs.cloudflare.com/ajax/libs/popper.js/1.14.3/umd/popper.min.js>"
  integrity="sha384-ZMP7rVo3mIykV+2+9J3UJ46jBk0WLaUAdn689aCwoqbBJiSnjAK/l8WvCWPIPm49"
  crossorigin="anonymous"></script>
<script
  src="<https://stackpath.bootstrapcdn.com/bootstrap/4.1.3/js/bootstrap.min.js>"
  integrity="sha384-ChfqqxuZUCnJSK3+MXmPNIyE6ZbWh2IMqE241rYiqJxyMiZ6OW/JmZQ5stwEULTy"
  crossorigin="anonymous"></script>
<script
  type="text/javascript"
  src="{% url 'javascript-catalog' %}"></script>
<script src="{% static 'django_comments_xtd/js/vendor~plugin-2.6.0.js' %}"></script>
<script src="{% static 'django_comments_xtd/js/plugin-2.6.0.js' %}"></script>
<script>
$(function() {
  $('[data-toggle="tooltip"]').tooltip({html: true});
});
</script>
{% endblock %}
All these were taken from the official documentation. The only things I modified are I changed object to post, and set allow_comments: true since our post model does not have field allow_comments
One more thing. Open file templates/base.html and before element <footer> add the following:
{% block extra-js %}
{% endblock extra-js %}
And at the beginning of the base.html add:
{% load i18n %}
Let's check if everything works. Run:
python manage.py migrate
This will update our database with new comment models and will add new model sites.
And then run the server:
python manage.py runserver
Check the article page http://localhost:8000/my-awesome-post/. You should be able to see the comment form:

The above screenshot demonstrates an authenticated user form. If you have not logged out from the admin page you should see the same form.
Now let's add our test comment, input your first comment and press send:
If we did everything right it should be working fine. Comment should be added. You can also try to log out from the admin page. Or just go to the http://localhost:8000/admin/logout/ and refresh the article page. Now you should see another form:

Let's try to add a comment when we are not authenticated. Take into account that the link here should be in the format 'http(s)://www.example.com'. Otherwise, it will throw you an error which is actually not clear that the URL is incorrect.
We are ready to customize the comments markup.
Customization
If you open post_detail.html sources you may find there:
<script src="{% static 'django_comments_xtd/js/vendor~plugin-2.6.0.js' %}"></script>
<script src="{% static 'django_comments_xtd/js/plugin-2.6.0.js' %}"></script>
vendor~plugin-2.6.0.js and plugin-2.6.0.js is a "packed" version of frontend comments logic written using React framework. Sources of these two files are located in django-comments-xtd library:
django_test_blog/venv/lib/python3.7/site-packages/django_comments_xtd/static/django_comments_xtd/js/src
In my case project folder is named django_test_blog(the same as the repository's name). And I'm using python3.7. In your case folder may vary depending on python's version.
Let me explain the basic idea here: we will copy the sources of comments front end part to our app, modifying it, compiling it and using it😉
Let's copy src folder to test_blog/frontend/django_comments_xtd/src. If you are in the project root directory you can run the command-line command:
mkdir -p "test_blog/frontend/django_comments_xtd" && cp -r "venv/lib/python3.7/site-packages/django_comments_xtd/static/django_comments_xtd/js/src" "test_blog/frontend/django_comments_xtd/src"
Now we need to steal few files from django-comments-xtd repository:
https://github.com/danirus/django-comments-xtd/blob/master/.babelrc
https://github.com/danirus/django-comments-xtd/blob/master/package.json
https://github.com/danirus/django-comments-xtd/blob/master/webpack.config.js
Copy them into frontend/django_comments_xtd folder:
wget "<https://raw.githubusercontent.com/danirus/django-comments-xtd/master/.babelrc>" -P "test_blog/frontend/django_comments_xtd/" \\
&& wget "<https://raw.githubusercontent.com/danirus/django-comments-xtd/master/package.json>" -P "test_blog/frontend/django_comments_xtd/" \\
&& wget "<https://raw.githubusercontent.com/danirus/django-comments-xtd/master/webpack.config.js>" -P "test_blog/frontend/django_comments_xtd/"
Now we have a configuration to pack the sources of the comments.
Let's examine and modify webpack.config.js. I replaced name STATIC_DIR to OUTPUT_DIR because it is more clear to me and changed paths to the following:
const OUTPUT_DIR = path.resolve(__dirname, '../../static/django_comments_xtd/js');
const SOURCE_DIR = path.resolve(__dirname, 'src');
Also don't forget to replace all STATIC_DIR occurrences to OUTPUT_DIR.
We've just set the instructions for webpack to build our comment sources located in SOURCE_DIR and put the result to OUTPUT_DIR.
npm, now it is your turn! Go to test_blog/frontend/django_comments_xtd folder and run:
npm install
Now let's pack our comments sources. Run:
npm run build
Open post_detail.html and replace:
<script src="{% static 'django_comments_xtd/js/vendor~plugin-2.6.0.js' %}"></script>
<script src="{% static 'django_comments_xtd/js/plugin-2.6.0.js' %}"></script>
To:
<script src="{% static 'django_comments_xtd/js/vendor~plugin-2.6.1.js' %}"></script>
<script src="{% static 'django_comments_xtd/js/plugin-2.6.1.js' %}"></script>
Basically we will use now our version generated by npm and webpack.
To verify that we are using our version let's make a change in file frontend/django_comments_xtd/src/commentform.jsx. Scroll to the bottom of the file, there should be method render(). Find line with
var label = django.gettext("Post your comment");
And change it to:
var label = django.gettext("Post your AWESOME comment");
In the folder test_blog/frontend/django_comments_xtd run:
npm run build
Now in the folder test_blog run:
python manage.py runserver
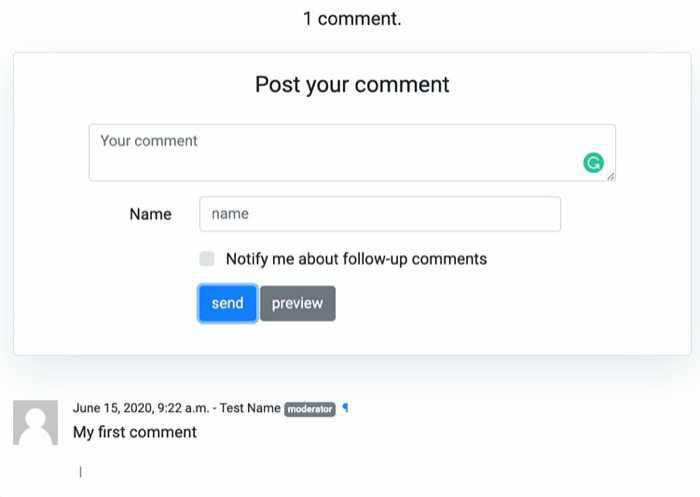
Now go to your article's page(http://localhost:8000/my-awesome-post/), scroll down and check whether it works:

Now I want to change mark up a little bit: move Comment Text Area below the Name, Mail and Link fields.
Now go to commentform.jsx, find render_form() to the line with return:
return (
<form method="POST" onSubmit={this.handle_submit}>
<input type="hidden" name="content_type"
defaultValue={this.props.form.content_type}/>
<input type="hidden" name="object_pk"
defaultValue={this.props.form.object_pk}/>
<input type="hidden" name="timestamp"
defaultValue={this.props.form.timestamp}/>
<input type="hidden" name="security_hash"
defaultValue={this.props.form.security_hash}/>
<input type="hidden" name="reply_to"
defaultValue={this.state.reply_to}/>
<fieldset>
<div style={{display:'none'}}>
<input type="text" name="honeypot" defaultValue=""/>
</div>
{comment} {name} {mail} {url} {followup} // Here we have our order of layout
</fieldset>
<div className={btns_row_class}>
<div className="offset-md-3 col-md-7">
<button type="submit" name="post"
className={btn_submit_class}>{btn_label_send}</button>
<button name="preview" className={btn_preview_class}
onClick={this.handle_preview}>{btn_label_preview}</button>
</div>
</div>
</form>
);
Let's move {comment} after {followup} and run:
npm run build
And then go to folder test_blog and run:
python manage.py runserver
If you already running it then you just need to refresh the page in your browser:

That is basically it.
Conclusion
Those were the basics of customizing django-comments-xtd. To continue edit you will need some basic knowledge of React + javascript and HTML. It is very easy actually. In the comments below you may see how I customized it for myself.
Trickier stuff was the integration of reCAPTCHA to the comments. I will prepare a small tutorial based on it later.
Source code can be found by the repository tag.
Under construction
Usually a blogger puts here some relative articles. I'm working on creating more interesting content. As soon as I have some related content I will implement some logic here. Below you may find some comments. If there is no any, it is your chance to leave the first comment:) PS.I'm glad you are here and reading this^^
