


Creating 2d orb with liquid in Unity
14525
Introduction
Let me clarify the final result right here. This is what we are going to do in this tutorial:

Recently at Grimwood Team I was in charge of creating some level progress. The main idea is that the player should keep fighting while some stuff is being filled with liquid and then goes an explosion and WIN! The main inspiration to implement something like this has come to us from Hollow Knight. Remember, there is a health progress "bar" designed like a skull is being filled with liquid soul(at least it is what I see)?

Let's implement this stuff.
PS. You may find source code at the repository of this tutorial.
Prerequisites
Unity 2019.3.2f1 - I'm using this version at the moment of writing this tutorial.
Orb texture with a little bit of transparency(glass-like effect).
Orb mask texture - in my case it is just a black orb-sized circle.
Orb border texture - as an additional effect for general composition.
Liquid Texture - texture that will be used to fill the orb(I've created a few ones in my repository for visual testing purposes).

Tutorial
Create an empty unity 2d project with an empty scene with the name "LiquidOrb".
Move all the prerequisite sprites to "LiquidOrb/Assets/Sprites".
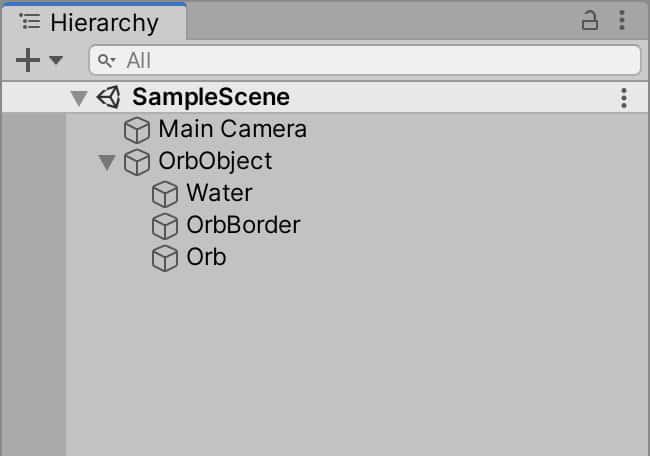
Let's create a hierarchy for our orb:
- Right-click on hierarchy, select "Create Empty". Name object "OrbObject"
- Right-click on "OrbObject", select "Create Empty". Name created object "Water"
- Right-click on "OrbObject", select "Create Empty". Name created object "OrbBorder"
- Right-click on "OrbObject", select "Create Empty". Name created object "Orb"
You should have the following structure:
Let's add Sprite Renderers to "Water", "OrbBorder" "Orb" game objects with the corresponding sprites attached. To do so select object and in the Inspector select "Add Component" and find "Sprite Renderer".
Setup z coords of the objects so that "Water" object will be behind "OrbBorder" and "Orb", "Orb" object will be between "Water" and "OrbBorder". I've set up 1, 0, -1 values for "Water", "Orb", "OrbBorder" correspondingly.

Setup "Water" object scale so that it will be covering "Orb".

We are all set to start doing magic.
Select "OrbObject", in the Inspector select "Add Component", find and add component "Sprite Mask". Attach orb_mask sprite to "Sprite Mask" component. Now you should see the mask borders on the scene(orange-browny line).

Don't worry, it will be a perfect circle when we finish. Just Unity renders it like this.
Let's mask our "Water" object. Select "Water" object and in the Sprite Renderer component switch property "Mask Interaction" to "Visible Inside Mask".
![]()
And now we can see something that looks like the final result.

Now we need to create new material with a shader that will provide the liquid behavior.
I've found a super cool effect at shadertoy:

That is almost exactly what we need.
I've forked this shader and made a little change to make "what we need" more clear:

Looks nice, huh? Let's bring this effect to our Unity project.
Go to our "LiquidOrb" project. Add folder "Assets/Shaders". Right-click on folder Shaders, select "Create", "Shader", "Image Effect Shader" (Or whatever shader - we will remove its content later). Name it "LiquidShader". Open this shader, let's check what we got inside.
Shader "Hidden/LiquidShader"
{
	//A lot of stuff goes here
}
Let's change "Hidden/LiquidShader" to "MyShaders/LiquidShader"(to make it available later) and remove all content of the Shader.
Shader "MyShaders/LiquidShader"
{
}
We don't need auto-generated content, it won't work as we expect for our effect since it does not have rules for masking stuff, etc. The idea here is to take unity sprite builtin shader and modify it with the shader from Shadertoy. I've uploaded unity builtin shaders to my GitHub account. You can find these shaders at the unity web site as well: Select version you like, click on Downloads, and Select "Builtin Shaders".
Let's update our Liquid Shader with the content of Unity Sprite's builtin shader. I'll use the version from my repository.
Now let's check that everything works fine:
- Create folder "Assets/Materials".
- Right click "Materials", select "Create", "Material". Name it "LiquidMaterial".
- Select "LiquidMaterial". In the inspector select "Shader", find and select "MyShaders", "LiquidShader".
Now we've created material for our liquid sprite. Select "Water" game object on the scene hierarchy. In the inspector, Sprite Renderer Component select Material, find and specify our "LiquidMaterial".
Everything should be fine and work as it was working before. That means that our custom stuff works. Now let's integrate shadertoy shader.
Shadertoy liquid shader is a fragment shader. Let's create a separate function for the fragment shader. In our "LiquidShader" go to section "Pass".
Pass
{
CGPROGRAM
    #pragma vertex SpriteVert
    #pragma fragment SpriteFrag // We need to change this part
    #pragma target 2.0
    #pragma multi_compile_instancing
    #pragma multi_compile_local _ PIXELSNAP_ON
    #pragma multi_compile _ ETC1_EXTERNAL_ALPHA
    #include "UnitySprites.cginc"
ENDCG
}
Currently, SpriteFrag is the fragment shader func which is implemented in #include "UnitySprites.cginc"
So let's create our custom func "frag" and put it below `#include "UnitySprites.cginc"`
Pass
{
CGPROGRAM
    #pragma vertex SpriteVert
    #pragma fragment frag // we've changed the name of the func to "frag". The implementation can be found below
    #pragma target 2.0
    #pragma multi_compile_instancing
    #pragma multi_compile_local _ PIXELSNAP_ON
    #pragma multi_compile _ ETC1_EXTERNAL_ALPHA
    #include "UnitySprites.cginc"

    fixed4 frag (v2f i) : SV_Target
    {
        fixed4 col = fixed4(0.0,0.0,0.0,0.0);
        return col;
    }
ENDCG
}
Now, on the scene, we should see that water isn't shown. It is because we've changed our fragment shader to return transparent color fixed4(0.0,0.0,0.0,0.0) for each position that comes to frag function.
Let's copy shader code from shadertoy Shader and paste it to LiquidShader below our frag function:
Pass
{
CGPROGRAM
    #pragma vertex SpriteVert
    #pragma fragment frag // We have changed the name of the function to "frag". You can find the implementation below
    #pragma target 2.0
    #pragma multi_compile_instancing
    #pragma multi_compile_local _ PIXELSNAP_ON
    #pragma multi_compile _ ETC1_EXTERNAL_ALPHA
    #include "UnitySprites.cginc"

    fixed4 frag (v2f i) : SV_Target
    {
        fixed4 col = fixed4(0.0,0.0,0.0,0.0);
        return col;
    }
		vec4 drawWater(vec4 water_color, sampler2D color, float transparency, float height, float angle, float wave_strength, float wave_ratio, vec2 uv);

		void mainImage(out vec4 fragColor, in vec2 fragCoord)
		{
		    vec2 uv = fragCoord / iResolution.xy;

		    float WATER_HEIGHT = abs(sin(iTime * 0.5));
		    vec4 WATER_COLOR = vec4(0.5, 0.5, 0.53, 1.0);
		    float WAVE_STRENGTH = 3.0;
		    float WAVE_FREQUENCY = 8.0;
		    float WATER_TRANSPARENCY = 0.4;
		    float WATER_ANGLE = 2.0;

		    fragColor = drawWater(WATER_COLOR, iChannel0, WATER_TRANSPARENCY, WATER_HEIGHT, WATER_ANGLE, WAVE_STRENGTH, WAVE_FREQUENCY, uv);
		}

		vec4 drawWater(vec4 water_color, sampler2D color, float transparency, float height, float angle, float wave_strength, float wave_frequency, vec2 uv)
		{
		    angle *= uv.y/height+angle/1.5; //3D effect
		    wave_strength /= 1000.0;
		    float wave = sin(10.0*uv.y+10.0*uv.x+wave_frequency*iTime)*wave_strength;
		    wave += sin(20.0*-uv.y+20.0*uv.x+wave_frequency*1.0*iTime)*wave_strength*0.5;
		    wave += sin(15.0*-uv.y+15.0*-uv.x+wave_frequency*0.6*iTime)*wave_strength*1.3;
		    wave += sin(3.0*-uv.y+3.0*-uv.x+wave_frequency*0.3*iTime)*wave_strength*10.0;

		    if(uv.y - wave <= height)
		        return mix(
		        mix(
		            texture(color, vec2(uv.x, ((1.0 + angle)*(height + wave) - angle*uv.y + wave))),
		            water_color,
		            0.6-(0.3-(0.3*uv.y/height))),
		        texture(color, vec2(uv.x + wave, uv.y - wave)),
		        transparency-(transparency*uv.y/height));
		    else
		        return vec4(0,0,0,0);
		}
ENDCG
}
As you may notice there are some differences between languages. Don't worry. Let's make the following changes:
- Copy header of frag function and replace the mainImage function header. Remove our previous frag function.
- Replace all vec4 to fixed4, vec2 to fixed2
- Replace fixed2 uv = fragCoord / iResolution.xy; to fixed2 uv = i.texcoord;
- Unity does not have iTime builtin variable, but it does have _Time variable. So replace iTime to _Time or I have better suggestions to create a float variable named iTime and assign _Time to it at the top of the functions frag and drawWater. I would also add multiplier for this iTime value since shadertoy time differs from Unity and it may seem too slow in Unity. So, let's multiply by 10.0. iTime = _Time * 10.0
- Replace iChannel0 to _MainTex
- Unity does not have texture function but it does have tex2D. Replace all texture func to tex2D
- Unity does not have mix function but it does have lerp. Change all mix to lerp.
- At the place where fragColor is defined add fixed4 fragColor = .... And add returnfragColor statement.
Now you can play the scene and see that the orb is slowly being filled by the liquid. We are almost there!
Let's update our shader to make all liquid settings WATER_HEIGHT, WATER_COLOR, WAVE_STRENGTH, WAVE_FREQUENCY, WATER_TRANSPARENCY, WATER_ANGLE customizable from the inspector.
Modify Properties section of LiquidShader to the following:
Properties
{
    [PerRendererData] _MainTex ("Sprite Texture", 2D) = "white" {}
    _Color ("Tint", Color) = (1,1,1,1)
    _Progress ("Progress", Range(0.0, 1.0)) = 0.5 // New One
    _WaterColor ("WaterColor", Color) = (1.0, 1.0, 0.2, 1.0) // New One
    _WaveStrength ("WaveStrength", Float) = 2.0 // New One
    _WaveFrequency ("WaveFrequency", Float) = 180.0 // New One
    _WaterTransparency ("WaterTransparency", Float) = 1.0 // New One
    _WaterAngle ("WaterAngle", Float) = 4.0 // New One
    [MaterialToggle] PixelSnap ("Pixel snap", Float) = 0
    [HideInInspector] _RendererColor ("RendererColor", Color) = (1,1,1,1)
    [HideInInspector] _Flip ("Flip", Vector) = (1,1,1,1)
    [PerRendererData] _AlphaTex ("External Alpha", 2D) = "white" {}
    [PerRendererData] _EnableExternalAlpha ("Enable External Alpha", Float) = 0
}
And in the section Pass below #include "UnitySprites.cginc" add the following:
#include "UnitySprites.cginc"

float _Progress; // New Var
fixed4 _WaterColor; // New Var
float _WaveStrength; // New Var
float _WaveFrequency; // New Var
float _WaterTransparency; // New Var
float _WaterAngle; // New Var

fixed4 drawWater(fixed4 water_color, sampler2D color, float transparency, float height, float angle, float wave_strength, float wave_frequency, fixed2 uv);
Update frag function to:
fixed4 frag (v2f i) : SV_Target
{
    fixed2 uv = i.texcoord;
    float WATER_HEIGHT = _Progress; // Custom Progress
    float4 WATER_COLOR = _WaterColor; // Custom Color
    float WAVE_STRENGTH = _WaveStrength; // Custom Strength
    float WAVE_FREQUENCY = _WaveFrequency; // Custom Frequency
    float WATER_TRANSPARENCY = _WaterTransparency; // Custom Water Transparency
    float WATER_ANGLE = _WaterAngle; // Custom Water Angle

    fixed4 fragColor = drawWater(WATER_COLOR, _MainTex, WATER_TRANSPARENCY, WATER_HEIGHT, WATER_ANGLE, WAVE_STRENGTH, WAVE_FREQUENCY, uv);
    return fragColor;
}
Now if you select LiquidMaterial from Materials Folder in the Inspector you will be able to see our custom params. You can run the unity scene and change them during running the scene. Cool, huh?
Now you can have access to your params from your scripts:
public class LiquidProgressController : MonoBehaviour
{
    public SpriteRenderer LiquidRenderer;
    public float AccumulatedTime;
    public float DelayCoef = 0.5f;

    // Update is called once per frame
    void Update()
    {
        AccumulatedTime += Time.deltaTime * DelayCoef;
        LiquidRenderer.material.SetFloat("_Progress", Mathf.Abs(Mathf.Sin(AccumulatedTime)));
    }
}
Conclusion
That was the basics of migrating shaders from ShaderToy to Unity. I would like a few things to be mentioned:
- If you want it run on a mobile phone then in the player settings you need to uncheck "Disable Depth and Stencil"(both iOS and Android). Otherwise masking won't work and the whole water texture will be displayed.
- If you want to make it work in UI you will need to write this shader for UI. It differs a little bit. The instructions are similar: Get default builtin shader for UI and update frag function, etc.
- There are many more visual things we can improve here like adding some particles with masking.
The source code can be found here.
I hope you enjoyed the reading and creating this effect! Let me know if everything was clear and helpful in the comments below.
PS. Perhaps tutorials like this would be easier to understand if they were video tutorials: screencasting and voice over. What do you think?
Update on October 10, 2020
I've added a new branch with the implementation of the UI Canvas case here. The only thing here is I'm using Unity 2019.4.12f1 version. But there should not be significant changes.
Under construction
Usually a blogger puts here some relative articles. I'm working on creating more interesting content. As soon as I have some related content I will implement some logic here. Below you may find some comments. If there is no any, it is your chance to leave the first comment:) PS.I'm glad you are here and reading this^^
