


reCAPTCHA your blog!
8816
No hay traducción en español. Ahora solo tengo la versión de inglés. Estoy trabajando en traducir todo el contenido que pueda. Gracias por entender!
Introduction
I've published this blog without any spam protection for contactme form. But later on, people started to post their messages twice accidentally via double-clicking "Send" button. And obviously it may be a nice way to spam me via some script, etc. That how I have come to the reCAPTCHA based protection.
In this tutorial, we will integrate reCAPTCHA v2.0 to the Contact Form. Later I will post a tutorial on how to integrate reCAPTCHA to django-comments-xtd react plugin. So stay tuned.
Prerequisites
I'll be using the base for the blog from Customizing Javascript Plugin from Django comments xtd tutorial. The sources for the initial setup can be found by my repository tag.
Contact Form
Our test blog does not have right now any contact form. So let's add it to the project. In the folder test_blog/templates create file contact.html with the following content:
{% extends "base.html" %}

{% block content %}
<div class="row justify-content-center">
    <div class="col-md-4">
        <h1>Contact me</h1>
        {% if new_message %}
        <p style="text-align:center">Your message has been sent. I will try to read it as soon as possible. Thank you!</p>
        {% else %}
        <form class="card pt-0 no-borders" method="POST">
            <input type="text" class="form-control" placeholder="Name"
                name="{{ form.name.name }}"
                id="{{ form.name.id_for_label }}"
                {% if form.name.value != None %}value="{{ form.name.value|stringformat:'s' }}"{% endif %}
                maxlength="{{ form.name.field.max_length }}"
                {% if form.name.field.required %}required{% endif %}>
            <input type="email" class="form-control" placeholder="Email"
                name="{{ form.from_email.name }}"
                id="{{ form.from_email.id_for_label }}"
                {% if form.from_email.value != None %}value="{{ form.from_email.value|stringformat:'s' }}"{% endif %}
                maxlength="{{ form.from_email.field.max_length }}"
                {% if form.from_email.field.required %}required{% endif %}>
            <textarea class="form-control" rows="5" placeholder="Text Message"
                    name="{{ form.message.name }}"
                    id="{{ form.message.id_for_label }}"
                    maxlength="{{ form.message.field.max_length }}"
                    {% if form.message.field.required %}required{% endif %}>{% if form.message.value != None %}{{ form.message.value|stringformat:'s' }}{% endif %}</textarea>
                {% csrf_token %}
                <div class="row m-0">
                    <button type="submit">Send</button>
                </div>
        </form>
        {% endif %}
    </div>
</div>
{% endblock %}
So, here we've prepared html template with all necessary fields for our contact form:
- Name - text input field with all params that come from object form.name
- Email - text input field with all params that come from object form.from_email
- Text Message - text area input field with all params that come from object form.message
And if we have object new_message({% if new_message %}) then we consider it as the message was sent successfully otherwise rendering the form.
Add a new class ContactForm that defines our form object to the file test_blog/blog/forms.py:
class ContactForm(forms.Form):
    name = forms.CharField(required=True)
    from_email = forms.EmailField(required=True)
    message = forms.CharField(widget=forms.Textarea, required=True)
There should be already CommentForm, just add ContactForm below it.
So we have defined Django form with 3 fields: name, from_email and message - simple combination of necessary information for a contact form. Should be quite clear here.
Now we need to define view for our new form. Add a new view contact_view to test_blog/blog/views.py:
from django.core.mail import send_mail, BadHeaderError
from django.http import HttpResponse
from django.shortcuts import render
from .forms import ContactForm

...

def contact_view(request):
    new_message = None
    form = ContactForm()
    if request.method == 'POST':
        form = ContactForm(request.POST)
        if form.is_valid():
            name = form.cleaned_data['name']
            from_email = form.cleaned_data['from_email']
            subject = "{0}. email: {1}".format(name, from_email)
            message = form.cleaned_data['message']
            try:
                send_mail(subject, message, 'contact_form@example.com', ['my_contact@example.com'])
                new_message = message
            except BadHeaderError:
                return HttpResponse('Invalid header found.')
    return render(request, "contact.html", {'form': form, 'new_message': new_message})
So, we are checking whether the request method is POST(the contact form was submitted). If it was submitted and it is valid we are gathering information from the form and send it via native Django email backend. If the form is not submitted then we just render the view based on contact.html template.
Update the test_blog/blog/urls.py with the following line:
...
		path("<slug:slug>/", views.post_detail, name="post_detail"),
    path("feed/rss", LatestPostsFeed(), name="post_feed"),
    path('contact', views.contact_view, name='contact') # this is the path for our contact form view
]
Go to the file test_blog/test_blog/settings.py and add the following configuration for email backend:
EMAIL_BACKEND = 'django.core.mail.backends.console.EmailBackend'
Let's check if everything works correctly now.
Now run the application(don't forget to go to the folder test_blog)
python manage.py runserver
Go to http://localhost:8000/contact . You should see contact form:

Try to send some message with filled form and check the console output. You should see a successful result.

[07/Jul/2020 12:00:14] "POST /contact HTTP/1.1" 200 3825
Content-Type: text/plain; charset="utf-8"
MIME-Version: 1.0
Content-Transfer-Encoding: 7bit
Subject: Test User. email: test@example.com
From: contact_form@example.com
To: my_contact@example.com
Date: Tue, 07 Jul 2020 12:15:28 -0000
Message-ID:
 <159412412808.41274.18010523702432611733@1.0.0.0.0.0.0.0.0.0.0.0.0.0.0.0.0.0.0.0.0.0.0.0.0.0.0.0.0.0.0.0.ip6.arpa>

example message is here
reCAPTCHAing Contact Form
Let's register a new site at Google Recaptcha admin.
I will put label example.com, reCAPTCHA v2 - "I'm not a robot" Checkbox, Domains - localhost(for now it is the only localhost for testing purposes; if you use 127.0.0.1 then add it too).

Then you should be able to see the following

Copy site key and secret key.
Site Key will be used in the template(client-side) and the secret key will be used on the server-side.
Let's add the secret key to settings.py:
G_CAPTCHA_SECRET_KEY = 'My-secret-key-from-google'
Information like is usually stored somewhere among the environment variables. So in my final version in the repository, there will be a version that loads this info from the environment.
And go to the contact.html template and set up reCAPTCHA widget. First, we need to add google javascript file:
<!--Add this after {% block content %}-->
<script src="<https://www.google.com/recaptcha/api.js>" async defer></script>
And the widget itself:
{% csrf_token %}
<!--reCAPTCHA Widget zone-->
<div class="g-recaptcha ml-auto mr-auto mb-4" data-sitekey="6Lcpqa4ZAAAAAPxNuoc7b81Tljx7bebrfP-Eq2ex"></div>
<!--end reCAPTCHA Widget zone-->
<div class="row m-0">
    <button type="submit">Send</button>
</div>
The data site key is a piece of open information. You don't have to hide it(But I did hide it on the screenshot, hehehe). But you still can put it into settings.py like G_CAPTCHA_SITE_KEY='6Lcpqa4ZAAAAAPxNuoc7b81Tljx7bebrfP-Eq2ex' and load in the template via implementing some custom tag that will get site key value in the template.
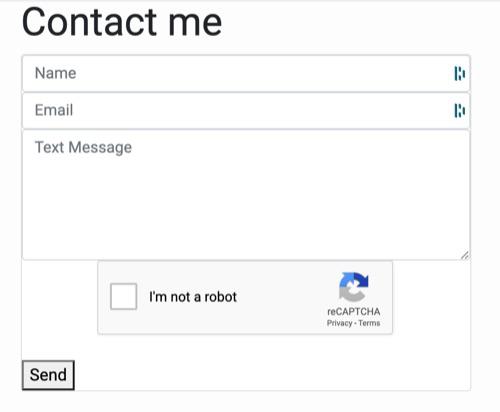
Now if you go to http://localhost:8000/contact, you will see reCAPTCHA widget above the send button:
If you want reCAPTCHA text loaded in another language you may specify that in the google script part:
<script src="<https://www.google.com/recaptcha/api.js?hl={{YOUR_LANGUAGE_CODE}>}" async defer></script>
We are almost there. The client part is ready. Let's move to the server-side. On the server-side we need to validate the client side's reCAPTCHA and then we can proceed to execute a request.
Let's install requests in our project:
pip install requests
Create file test_blog/test_blog/decorators.py with the following content:
from django.conf import settings
from django.contrib import messages
import requests

def check_recaptcha(function):
    def wrap(request, *args, **kwargs):
        request.recaptcha_is_valid = None
        if request.method == 'POST':
            recaptcha_response = request.POST.get('g-recaptcha-response')
            data = {
                'secret': settings.G_CAPTCHA_SECRET_KEY,
                'response': recaptcha_response

            r = requests.post('<https://www.google.com/recaptcha/api/siteverify>', data=data)
            result = r.json()
            if result['success']:
                request.recaptcha_is_valid = True
            else:
                request.recaptcha_is_valid = False
                messages.error(request, 'Invalid reCAPTCHA. Please try again.')
        return function(request, *args, **kwargs)

    wrap.__doc__ = function.__doc__
    wrap.__name__ = function.__name__
    return wrap
Basically this is a wrapper function for any request. What it does is first validating the captcha stuff through google and then executing the original function if validation is ok. In the original function request parameter will contain recaptcha_is_valid parameter which we can use to decide what to do next.
Let's update blog/views.pycontact_view func with checking recaptcha validation:
def contact_view(request):
    new_message = None
    form = ContactForm()
    if request.method == 'POST':
        form = ContactForm(request.POST)
        if form.is_valid() and request.recaptcha_is_valid: # Check recaptcha validation
            name = form.cleaned_data['name']
            from_email = form.cleaned_data['from_email']
            subject = "{0}. email: {1}".format(name, from_email)
            message = form.cleaned_data['message']
            try:
                send_mail(subject, message, 'contact_form@example.com', ['my_contact@example.com'])
                new_message = message
            except BadHeaderError:
                return HttpResponse('Invalid header found.')
    return render(request, "contact.html", {'form': form, 'new_message': new_message})
Go to blog/urls.py and modify view for contact path:
from . import views
from django.urls import path
from .feeds import LatestPostsFeed
from test_blog.decorators import check_recaptcha # Add this import

urlpatterns = [
    #path('', views.PostLists.as_view(), name='home'),
    path('', views.PostLists, name='home'),
    #path('<slug:slug>/', views.PostDetail.as_view(), name='post_detail'),
    path("<slug:slug>/", views.post_detail, name="post_detail"),
    path("feed/rss", LatestPostsFeed(), name="post_feed"),
    path('contact', check_recaptcha(views.contact_view), name='contact') # Wrap this one with check_recaptcha
]
And let's add displaying messages for the case our Recaptcha was not validated ok or something else went wrong. Update contact.html
{% csrf_token %}
<!--reCAPTCHA Widget zone-->
<div class="g-recaptcha ml-auto mr-auto mb-4" data-sitekey="6Lcpqa4ZAAAAAPxNuoc7b81Tljx7bebrfP-Eq2ex"></div>
<!--end reCAPTCHA Widget zone-->
<br/>
<!--Displaying messages here-->
{% if messages %}
    <div class="alert alert-danger ml-auto mr-auto mb-4 text-center">
    {% for message in messages %}
        <p>{{ message }}</p>
    {% endfor %}
    </div>
{% endif %}
<!--End displaying messages-->
<div class="row m-0">
    <button type="submit">Send</button>
</div>
Now let's run our server and go to http://localhost:8000/contact. Try to input data without checking "I'm not a robot" and press send. You should see a message that imply you are a robot, mister Skynet:

Now try not to be a robot and live your human life.
Conclusion
Yes. There is a ready django recaptcha plugin that already makes your life easier. But this is a tutorial, we are learning stuff and under the hood of the above-mentioned plugin, you may find almost the same we did in this tutorial.
I will try to post a tutorial on integrating Recaptcha to django-comments-xtd ASAP and I guess that will be the final tutorial on django-comments-xtd story(who knows).
Full source code can be found at this repository. Remember that you need to add an environment variable with your secret key. Check settings.py.
By the way, there is a reCAPTCHA v3.0 and I guess google has invented it after this video.
Bajo construcción
Usualmente un blogger pone aquí algunos artículos relativos. Estoy trabajando en crear más contenido interesante. Tan pronto como tengo algun contenido relativo implementaré algo de lógica aquí. A continuación puede encontrar algunos comentarios. Si no hay nada, es tu oportunidad de dejar el primer comentario:) PS.Me alegra que esté aquí y lea esto^^
